2. Tutorial
In this tutorial we will begin with the basic UI of fuddly. Then
we will see how to use fuddly directly from an advanced python
interpreter like ipython. Finally, we will walk through basic
steps to create a new data model and the way to define specific
disruptors.
2.1. Using fuddly simple UI: Fuddly Shell
A simple UI—called Fuddly Shell—allows to interact with fuddly in
an easy way. In this tutorial we present the usual commands that can
be used during a fuzzing session. But first we have to launch it by
running the <root of fuddly>/fuddly_shell.py script.
Note
This script basically does the following:
1 fmk = FmkPlumbing()
2 fmk.start()
3
4 shell = FmkShell("Fuddly Shell", fmk)
5 shell.cmdloop()
2.1.1. Start a Fuzzing Session
After running this script you should be prompted with something like this:
 1===============================================================[ Data Models ]==
 2>>> Look for Data Models within 'data_models' directory
 3*** Found Data Model: 'mydf' ***
 4*** Found Data Model: 'example' ***
 5>>> Look for Data Models within 'data_models/protocols' directory
 6*** Found Data Model: 'usb' ***
 7>>> Look for Data Models within 'data_models/file_formats' directory
 8*** Found Data Model: 'zip' ***
 9*** Found Data Model: 'png' ***
10*** Found Data Model: 'pdf' ***
11*** Found Data Model: 'jpg' ***
12==================================================================[ Projects ]==
13>>> Look for Projects within 'projects/specific' Directory
14*** Found Project: 'usb' ***
15>>> Look for Projects within 'projects/generic' Directory
16*** Found Project: 'standard' ***
17============================================[ Fuddly Home Information ]==
18
19 --> data folder: ~/.local/share/fuddly/
20 --> contains: - fmkDB.db, logs, imported/exported data, ...
21               - user projects and user data models, ...
22 --> config folder: ~/.config/fuddly/
23
24-=[ Fuddly Shell ]=- (with Fuddly FmK 0.30)
25
26>>
Note that fuddly looks for Data Model files (within
data_models/) and Project files (within projects/) during
its initialization. A Project file is used to describe the targets
that can be tested, the logger behaviour, and optionally specific
monitoring means as well as some scenarios and/or virtual operators.
Note
Projects and data models files are retrieved either from
<root of fuddly>/{projects,data_models}/ or from
<fuddly data folder>/{projects,data_models}/.
Note that when the Fuddly shell is launched, the path of the fuddly data folder is displayed as well as its configuration folder.
See also
To create a new project file, and to describe the associated components refer to Defining a Project Environment.
Once loaded, a project can be used with any data models. Basically, that means you can send any kind of data (among the defined ones) to any target described within your project file.
Let’s start by loading the standard project which define some
targets to play with:
1>> load_project standard
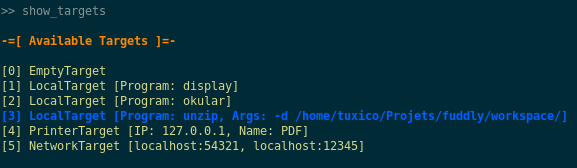
You can look at the defined targets by issuing the following command:
 1>> show_targets
 2
 3-=[ Available Targets ]=-
 4
 5[0] EmptyTarget [ID: 307144]
 6[1] LocalTarget [Program: display]
 7[2] LocalTarget [Program: okular]
 8[3] LocalTarget [Program: unzip, Args: -d ~/.local/share/fuddly/workspace/]
 9[4] PrinterTarget [IP: 127.0.0.1, Name: PDF]
10[5] NetworkTarget [localhost:54321, localhost:12345]
By default, the EmptyTarget is selected in order to let you
experiment without a real target. But let’s say you want to fuzz the
unzip program. You first have to select it:
1>> load_targets 3
Note
You can also load several targets at the same time if you want to sequence different actions
through various systems or on the same system but through different kinds of interfaces
(represented by different targets). To do it, provide a list of target IDs to the
load_targets command. For instance to load the targets 1, 4 and 5, issue the command:
>> load_targets 1 4 5
See also
In order to define new targets, look at Defining the Targets.
See also
Target (framework.target_helpers.Target) configuration cannot
be changed dynamically within Fuddly Shell. But you can do it
through any python interpreter, by directly manipulating the
related Target object. Look at Using fuddly Through Advanced Python Interpreter.
You also need to choose a Data Model that you want to use with the selected target. For that purpose you can first list the available data models:
 1>> show_data_models
 2
 3-=[ Data Models ]=-
 4
 5[0] mydf
 6[1] usb
 7[2] zip
 8[3] png
 9[4] pdf
10[5] jpg
11 ...
As we select the unzip program as a target, we may want to
perform ZIP fuzzing ;) Thus we select this data model by issuing the
following command:
1>> load_data_model zip
And then we launch the loaded project and all the components by issuing the following command:
 1>> launch
 2
 3*** Data Model 'zip' loaded ***
 4*** Logger is started ***
 5*** Target initialization: (0) EmptyTarget [ID: 307144] ***
 6*** Monitor is started ***
 7
 8*** [ Sending delay = 0.00s ] ***
 9*** [ Number of data sent in burst = 1 ] ***
10*** [ Target EmptyTarget [ID: 241984] health-check timeout = 10.0s ] ***
11>>
Note
Note that just after the project is launched, some internal parameters are displayed, namely:
The sending delay, which allows you to set a minimum delay between two data emission. (Can be changed through the command
set_delay).The maximum number of data that will be sent in burst, thus ignoring the sending delay. (Can be changed through the command
set_burst)The timeout value for checking target’s health. (Can be changed through the command
set_health_check_timeout)
Finally, you may prefer to directly launch your project thanks to
the command run_project. Indeed, by using it, you will automatically trigger the commands we
just talked about. Regarding the loaded data models it will initially load what is defined as default
in the project file. In the case of the standard project, if you issue the following command:
>> run_project standard
the imaginary data model used by our tutorial (mydf) will be loaded and the default target
will be chosen, namely the EmptyTarget (usefull for testing purpose) with the ID 0.
In order to run the project with the unzip target (ID 4), you will have to issue the following
command:
>> run_project standard 4
Note
If you want to load other targets while your project is currently running, you should use the
reload_all command (refer to Reloading Data Models / Targets / …)
Note
If you want to load another data model at any time while your
project is launched, use simply the command load_data_model
with the name of the data model you want to use, and that’s all.
You can also load multiple data models through the command
load_multiple_data_model <dm_name_1> <dm_name_2>
... [dm_name_n]
, if you want to interact with a target with
different data models simultaneously.
Note
The help command shows you every defined command within
Fuddly Shell. You can also look at a brief command description and
syntax by typing help <command_name>
2.1.2. Send Malformed ZIP Files to the Target (Manually)
2.1.2.1. How to Send a ZIP File
In order to send a ZIP file to a loaded target, type the following:
>> send ZIP [target ID]
In our case we previously only loaded the target ID 3 (linked to the unzip program). It means that
issuing the following command with 3 as <target ID> will invoke the unzip program with a ZIP file:
__ setup generator 'g_zip' __

========[ 1 ]==[ 18/08/2015 - 19:24:34 ]=======================
### Target ack received at: None
### Step 1:
 |- generator type: ZIP | generator name: g_zip | User input: G=[ ], S=[ ]
### Data size: 47360 bytes
### Emitted data is stored in the file:
/home/test/Tools/fuddly/exported_data/zip/2015_08_18_192434_00.zip
### Target Feedback:
...
>>
Note
If you don’t provide a target ID on the command line, the one that will be used will be the first loaded one. Thus in our case, we can forget to specify the target ID.
Note
You can also send data to multiple targets at once (assuming that you enabled them at first), by providing the list of target IDs like the following command:
>> send ZIP 3 5
Note that a framework.data_model.DataModel can define any number of data
types—to model for instance the various atoms within a data format,
or to represent some specific use cases, …
When a data model is loaded, a dynamic Generator is built for each data types registered within this data model. A Generator is the basic block for generating data. In our case, let us consult the Generators available for the ZIP data model:
>> show_generators

-=[ SPECIFIC GENERATORS ]=-

*** Available generators of type 'ZIP' ***
  name: g_zip (weight: 1, valid: True)
  generic args:
    |_ random
    |      | desc: make the data model random
    |      | default: False [type: bool]
    |_ determinist
    |      | desc: make the data model determinist
    |      | default: False [type: bool]
    |_ finite
    |      | desc: make the data model finite
    |      | default: False [type: bool]

*** Available generators of type 'ZIP_00' ***
  name: g_zip_00 (weight: 1, valid: True)
  generic args:
    |_ random
    |      | desc: make the data model random
    |      | default: False [type: bool]
    |_ determinist
    |      | desc: make the data model determinist
    |      | default: False [type: bool]
    |_ finite
    |      | desc: make the data model finite
    |      | default: False [type: bool]

...
You can see that two generators are available for this data model. In
this case—the ZIP data model—the first one will generate modeled
ZIP archive based uniquely on the data model, whereas the other ones
(ZIP_00, ZIP_01, …) generate modeled ZIP archives based on
the sample files available within the directory
<fuddly data folder>/imported_data/zip/.
For each one of these generators, some parameters are associated:
random: Enforce the generator to generate data in a random way;determinist: Enforce the generator to generate data in a deterministic way;finite: Enforce the generator to generate a finite number of data.
To send in a loop, five ZIP archives generated from the data model in a deterministic way—that is by walking through the data model—you can use the following command:
>> send_loop 5 ZIP(determinist=True) tWALK
We use for this example, the generic stateful disruptor tWALK whose purpose
is to simply walk through the data model. Note that disruptors are
chainable, each one consuming what comes from the left.
See also
Refer to How to Perform Automatic Modification on Data for details on data makers chains.
Note that if you want to send data indefinitely until the generator exhausts (in our case ZIP)
or a stateful disruptor (in our case tWALK) of the chain exhausts you should use -1 as
the number of iteration. In our case it means issuing the following command:
>> send_loop -1 ZIP(determinist=True) tWALK
And if you want to stop the execution before the normal termination (which could never happen if
the finite parameter has not been set), then you have to issue a SIGINT signal to fuddly via
Ctrl-C for instance.
2.1.2.2. How to Perform Automatic Modification on Data
In order to perform modification on a generated data, you can use
disruptors (look at Generic Disruptors), which are the
basic blocks for this task. You can look at the available
disruptors—either specific to the data model or generic–by typing
the command show_disruptors, which will print a brief description
of each disruptor along with their parameters.
Note
The following command allows to briefly look at all the defined generators and disruptors (called data makers), usable within the frame of the current data model.
>> show_dmaker_types

===[ Generator Types ]==========================================================

 [ Specific ]
   | 4TG1, 4TG2, ABSTEST, ABSTEST2, ENC
   | EXIST_COND, LEN_GEN, MISC_GEN, OFF_GEN, SEPARATOR
   | SHAPE, TESTNODE, ZIP, ZIP_00

===[ Disruptor Types ]==========================================================

 [ Generic ]
   | ALT, C, COPY, Cp, EXT
   | FIX, MOD, NEXT, SIZE, STRUCT
   | tALT, tSEP, tSTRUCT, tTERM, tTYPE
   | tWALK
You can also chain disruptors in order to perform advanced transformations—kind of dataflow programming. You can mix generic/specific stateless/stateful disruptors, fuddly will take care of sequencing everything correctly.
Let’s illustrate this with the following example:
1>> send ZIP_00 C(nb=2:path="ZIP_00/file_list/.*/file_name") tTYPE(max_steps=50:order=True) SIZE(sz=256)
2
3__ setup generator 'g_zip_00' __
4__ setup disruptor 'd_corrupt_node_bits' __
5__ cleanup disruptor 'd_fuzz_typed_nodes' __
6__ setup disruptor 'd_fuzz_typed_nodes' __
7__ setup disruptor 'd_max_size' __
8
9========[ 1 ]==[ 20/08/2015 - 15:20:06 ]=======================
10### Target ack received at: None
11### Step 1:
12 |- generator type: ZIP_00 | generator name: g_zip_00 | User input: G=[ ], S=[ ]
13### Step 2:
14 |- disruptor type: C | disruptor name: d_corrupt_node_bits | User input: G=[ ], S=[nb=2,path='ZIP_00/file_list/.*/file_name']
15 |- data info:
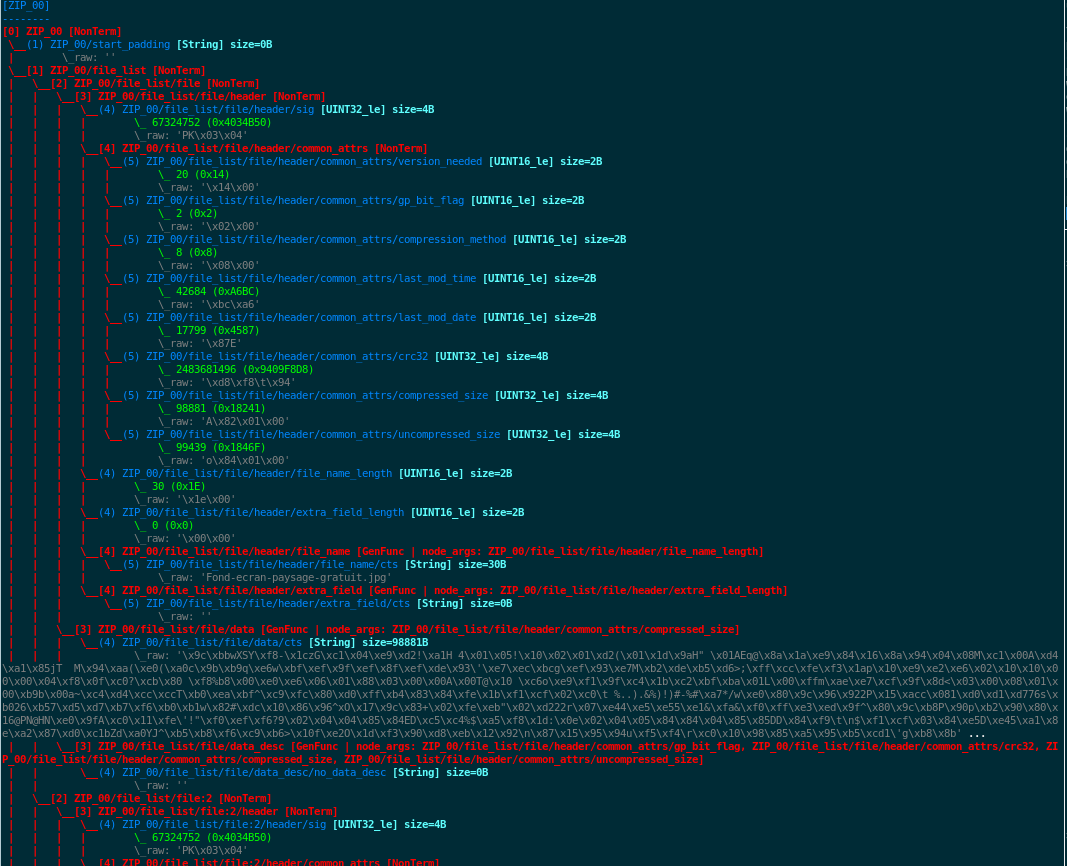
16 |_ current fuzzed node: ZIP_00/file_list/file:3/header/file_name/cts
17 |_ orig data: b'photo-photo-paysage-norvege.png'
18 |_ corrupted data: b'photo-\xf8hoto-paysage-norvege.png'
19 |_ current fuzzed node: ZIP_00/file_list/file:2/header/file_name/cts
20 |_ orig data: b'hello.pdf'
21 |_ corrupted data: b'hello.pd\xf6'
22### Step 3:
23 |- disruptor type: tTYPE | disruptor name: d_fuzz_typed_nodes | User input: G=[max_steps=50], S=[order=True]
24 |- data info:
25 |_ model walking index: 1
26 |_ |_ run: 1 / -1 (max)
27 |_ current fuzzed node: ZIP_00/file_list/file/header/common_attrs/version_needed
28 |_ |_ value type: <framework.value_types.Fuzzy_INT16 object at 0x7fbf961e5250>
29 |_ |_ original node value: b'1400' (ascii: b'\x14\x00')
30 |_ |_ corrupt node value: b'1300' (ascii: b'\x13\x00')
31### Step 4:
32 |- disruptor type: SIZE | disruptor name: d_max_size | User input: G=[ ], S=[sz=256]
33 |- data info:
34 |_ orig node length: 1054002
35 |_ right truncation
36 |_ new node length: 256
37### Data size: 256 bytes
38### Emitted data is stored in the file:
39/home/test/Tools/fuddly/exported_data/zip/2015_08_20_152006_00.zip
40>>
After the command is issued, fuddly will ask the generator ZIP_00
to generate a modeled ZIP archive and then will provide the outcomes
to the following disruptor C. At this moment, fuddly will disable
temporarily the generator, as the generated data need to be fully
consumed first.
The disruptor C will then be executed to consume the generated
data. This disruptor performs basic corruption within the modeled data
(it randomly chooses nodes of the graph-based modeled data and perform
random bit corruption on them). You can see that some parameters are
also given to it, namely: nb and path. These parameters are
specific to this disruptor. The first one asks it to choose only two
nodes and the second one restrict the set of nodes thanks to a regular
expression that selects the root paths from which the terminal nodes
to corrupt can be chosen.
Note
As the data model of fuddly is built on directed graphs, we
call paths in fuddly the graph paths of the graph
representing the data. For more information on fuddly data model
refer to Data Modeling.
In order to select nodes in the graph from the root or another
node, different criteria (syntactic & semantic) can be provided to
fuddly’s low-level primitives. One of this criteria is paths,
and the syntax defined to represent paths is similar to the one of
filesystem paths. Each path are represented by a python string,
where node identifiers are separated by /’s. For instance:
'ZIP/file_list/file:2/header', is a path from the root of a
modeled ZIP archive to the header of its second file.
In this case we even restricted the nodes to be only the
file_name nodes among all the files of the ZIP archive, as you
can see on lines 16 & 19.
See also
If you want to see an ASCII representation of the data,
in order to grasp the way the graph is built, issue the
command show_data after the generation process. It
will depict something like what is shown here under.
Note
Parameters are given to data makers
(generators/disruptors) through a tuple wrapped with the characters
( and ) and separated with the character :. Syntax:
data_maker_type(param1=val1:param2=val2)
After C has performed its corruption, fuddly gets the result and
provides it to tTYPE. This disruptor is stateful, so it could
outputs many different data from the one provided to it. In this
specific case, it will walk the graph representing the data and
generate new samples each time it encounter a typed terminal node. In
the previous run, we see on line 30 that the
original value of the terminal node ../version_needed (a
little-endian UINT16) has been altered to 1300 from the original
value 1400—which are the hexadecimal encoded representation of
the integer. Basically, the disruptor performed a decrement by one of
this integer. On the next run—line 16—you can
see that this disruptor performs an increment by one instead of. And
it will change this integer until he has no more cases—these cases
are based on the syntactic & semantic properties provided within the
ZIP data model. Afterwards, it will go on with the next node.
Note
Stateless disruptors output exactly one data for each data provided as input.
Stateful disruptors can output many data after being fed by only one
data. When a stateful disruptor is called by fuddly—within a
chain of disruptors—every data makers on its left are
temporarily disabled. Thus, the next time the chain of disruptors
is issued, the execution will begin directly with this stateful
disruptor. And when this one has fully consumed its input, that is,
when it cannot output any new data and handover to fuddly, the
latter will re-enable the nearest left-side stateful disruptors
that can provide new data, or the generator otherwise.
See also
About model walking infrastructure of fuddly refer to
Defining Specific Disruptors. Insights about how it deals with
non-terminal changing nodes is provided.
About the parameters given to tTYPE, the generic one
max_steps=50 requests this disruptor to stop producing new data
after a maximum of 50 for a unique input. The specific one
order=True request it to strictly follow the data structure for
producing its outcomes. Whether the order is set to False (or not
given, as False is its default), the traversal to the data
structure will be guided by other criteria depending on properties
specified within the data model, especially the fuzz weight
attribute that can be changed on any node and which defaults to 1. The
bigger the value the higher the priority to be altered.
Note
To consult the help of a specific disruptor you can issue
the command show_disruptors <DISRUPTOR_TYPE>
Finally, every data produced by tTYPE is given to the stateless
disruptor SIZE whose purpose is to truncate the data if its size
exceeds 256—as the parameter sz is equal to 256.
 1>> send ZIP_00 C(nb=2:path="$ZIP/file_list.*") tTYPE(max_steps=50:order=True) SIZE(sz=256)
 2
 3========[ 2 ]==[ 20/08/2015 - 15:20:08 ]=======================
 4### Target ack received at: None
 5### Initial Generator (currently disabled):
 6 |- generator type: ZIP_00 | generator name: g_zip_00 | User input: G=[ ], S=[ ]
 7  ...
 8### Step 1:
 9 |- disruptor type: tTYPE | disruptor name: d_fuzz_typed_nodes | User input: G=[max_steps=50], S=[order=True]
10 |- data info:
11    |_ model walking index: 2
12    |_  |_ run: 2 / -1 (max)
13    |_ current fuzzed node:     ZIP_00/file_list/file/header/common_attrs/version_needed
14    |_  |_ value type:         <framework.value_types.Fuzzy_INT16 object at 0x7fbf961e5250>
15    |_  |_ original node value: b'1400' (ascii: b'\x14\x00')
16    |_  |_ corrupt node value:  b'1500' (ascii: b'\x15\x00')
17    |_ Data maker [#1] of type 'ZIP_00' (name: g_zip_00) has been disabled by this disruptor taking over it.
18    |_ Data maker [#2] of type 'C' (name: d_corrupt_node_bits) has been disabled by this disruptor taking over it.
19### Step 2:
20 |- disruptor type: SIZE | disruptor name: d_max_size | User input: G=[ ], S=[sz=256]
21 |- data info:
22    |_ orig node length: 1054002
23    |_ right truncation
24    |_ new node length: 256
25### Data size: 256 bytes
26### Emitted data is stored in the file:
27/home/test/Tools/fuddly/exported_data/zip/2015_08_20_152008_00.zip
28>>
On this second command execution you can see on
lines 17-18 that the generator ZIP_00 and the disruptor C have
been disabled as explained before.
 1...
 2========[ 50 ]==[ 20/08/2015 - 15:20:11 ]=======================
 3### Target ack received at: None
 4### Initial Generator (currently disabled):
 5 |- generator type: ZIP_00 | generator name: g_zip_00 | User input: G=[ ], S=[ ]
 6  ...
 7### Step 1:
 8 |- disruptor type: tTYPE | disruptor name: d_fuzz_typed_nodes | User input: G=[max_steps=50], S=[order=True]
 9 |- data info:
10    |_ model walking index: 50
11    |_  |_ run: 6 / -1 (max)
12    |_ current fuzzed node:     ZIP_00/file_list/file/header/common_attrs/uncompressed_size
13    |_  |_ value type:         <framework.value_types.Fuzzy_INT32 object at 0x7fbfec9e9048>
14    |_  |_ original node value: b'6f840100' (ascii: b'o\x84\x01\x00')
15    |_  |_ corrupt node value:  b'00000080' (ascii: b'\x00\x00\x00\x80')
16    |_ Data maker [#1] of type 'ZIP_00' (name: g_zip_00) has been disabled by this disruptor taking over it.
17    |_ Data maker [#2] of type 'C' (name: d_corrupt_node_bits) has been disabled by this disruptor taking over it.
18### Step 2:
19 |- disruptor type: SIZE | disruptor name: d_max_size | User input: G=[ ], S=[sz=256]
20 |- data info:
21    |_ orig node length: 1054002
22    |_ right truncation
23    |_ new node length: 256
24### Data size: 256 bytes
25### Emitted data is stored in the file:
26/home/test/Tools/fuddly/exported_data/zip/2015_08_20_152011_15.zip
27__ disruptor handover 'd_fuzz_typed_nodes' __
28-------------------
29| ERROR / WARNING |
30-------------------
31    (_ FMK [#DataUnusable]: The data maker (tTYPE) has returned unusable data. _)
32    (_ FMK [#HandOver]: Disruptor 'd_fuzz_typed_nodes' (tTYPE) has yielded! _)
33>>
If you go on issuing the same command, you will arrive at a point
where tTYPE stops producing new data as seen above on lines 31 & 32. Thus, if you go on, this time
the generator will be re-enabled to produce new data as well as the
disruptor C, as seen below on line 3 & 5.
 1========[ 51 ]==[ 20/08/2015 - 15:26:19 ]=======================
 2### Target ack received at: None
 3### Step 1:
 4 |- generator type: ZIP_00 | generator name: g_zip_00 | User input: G=[ ], S=[ ]
 5### Step 2:
 6 |- disruptor type: C | disruptor name: d_corrupt_node_bits | User input: G=[ ], S=[nb=2,path='ZIP_00/file_list/.*/file_name']
 7 |- data info:
 8    |_ current fuzzed node: ZIP_00/file_list/file:2/header/file_name/cts
 9    |_ orig data: b'hello.pdf'
10    |_ corrupted data: b'hello\xafpdf'
11    |_ current fuzzed node: ZIP_00/file_list/file/header/file_name/cts
12    |_ orig data: b'Fond-ecran-paysage-gratuit.jpg'
13    |_ corrupted data: b'Fond-ecran-paysage\xafgratuit.jpg'
14### Step 3:
15 |- disruptor type: tTYPE | disruptor name: d_fuzz_typed_nodes | User input: G=[max_steps=50], S=[order=True]
16 |- data info:
17    |_ model walking index: 1
18    |_  |_ run: 1 / -1 (max)
19    |_ current fuzzed node:     ZIP_00/file_list/file/header/common_attrs/version_needed
20    |_  |_ value type:         <framework.value_types.Fuzzy_INT16 object at 0x7fbfec9895f8>
21    |_  |_ original node value: b'1400' (ascii: b'\x14\x00')
22    |_  |_ corrupt node value:  b'1300' (ascii: b'\x13\x00')
23### Step 4:
24 |- disruptor type: SIZE | disruptor name: d_max_size | User input: G=[ ], S=[sz=256]
25 |- data info:
26    |_ orig node length: 1054002
27    |_ right truncation
28    |_ new node length: 256
29### Data size: 256 bytes
30### Emitted data is stored in the file:
31/home/test/Tools/fuddly/exported_data/zip/2015_08_20_152619_00.zip
Last, to avoid re-issuing the same command for each time you
want to send a new data, you can use the send_loop command as
follows:
>> send_loop <NB> ZIP_00 C(nb=2:path="ZIP_00/file_list/.*") tTYPE(max_steps=50:order=True) SIZE(sz=256)
where <NB> shall be replaced by the maximum number of iteration
you want before fuddly return to the prompt. Note that it is a
maximum; in our case it will stop at the 50 th run because of
tTYPE. Note that you can also use the special value -1 to loop indefinitely
or until a data maker is exhausted.
In such situation, if you want to interrupt the looping, just use Ctrl+C.
2.1.2.3. Resetting & Cloning Disruptors
Whether you want to use generators or disruptors that you previously used in a data maker chain, you would certainly need to reset it or to clone it. Indeed, every data maker has an internal sequencing state, that remember if it has been disabled (and for generators it may also keeps the seeds). Thus, if you want to reuse it, one way is to reset it by issuing the following command:
>> reset_dmaker <dmaker_type>
where <dmaker_type> is the data maker to reset, for instance:
ZIP_00, tTYPE, …
You can also reset all the data makers at once by issuing the following command:
>> reset_all_dmakers
Note
In the case where the original data (i.e., the pristine generated data that does not get changed
by any disruptor) is asked to be preserved (for instance by using the command send_loop_keepseed),
for repeatability purpose (when issuing the same command again), using the previous command will
also remove this original data. Thus you could prefer to use the command cleanup_dmaker that
will only reset the sequencing state, without resetting the seed (i.e., the original data).
Note that keeping such seeds may consume a lot of memory at some point. Moreover, they may only be useful for non-determinist data model.
Another way that can reveal itself to be useful (especially within
framework.tactics_helper.Operator— refer to
Defining Operators) is to clone a data maker. By doing so, you have
a new independent data maker that can be used in another data maker
chain. To create a clone, just add #ID (where ID shall be
replaced by a string up to 20 alphanumeric characters or underscore)
to an existing data maker. For instance, issuing the following command,
after having issuing the commands from the section
How to Perform Automatic Modification on Data, won’t alter anything regarding the state of
the cloned data makers:
>> send ZIP_00#new tTYPE#new
2.1.2.4. Reloading Data Models / Targets / …
If during a test session you want to perform a modification within the
data model without restarting fuddly, you can simply edit the data
model with your favorite editor, and after saving it, issue the
command reload_data_model at the Fuddly Shell prompt.
If you also want to modify the target abstraction or operators or
probes, …, you have to reload every fuddly subsystems. To do so, you
only need to issue the command reload_all.
Now, imagine that you want to switch to a new target already
registered, simply issue the command reload_all [target_ID1 .. target_ID2], where
target IDs are picked up through the IDs displayed by the command
show_targets
Finally, if you want to switch to a new data model while a project is
already launched, simply issue the command load_data_model
<data_model_name> to let fuddly do the job for you.
2.1.3. Use an Operator to Send Malformed Data
Operators (framework.tactics_helper.Operator) are useful
to automate the fuzzing process, that is to automatically collect
target feedback when its worth it, to automatically save test cases
that affect the target and to automatically decide on the following
steps based on thoughtful criteria.
Let’s take the example of a fuzzing operator defined in the
standard project, and use it to fuzz JPG files and send them to
the display program—target number 3.
See also
To define your own operators refer to Defining Operators.
First, we need to launch the project standard and to specify the
target number 3. You can do it in one line by issuing the following
command:
>> run_project standard 3
The last parameter of is the identifier of the
target. It’s a shortcut to what have been presented in section
Start a Fuzzing Session. If you issue the command show_targets
you will notice the enabled target as it is highlighted in the
console, like you can see in the figure bellow.
You can now load the JPG data model:
>> load_data_model jpg
Then, you can look at the available operators and learn about their parameters by issuing the command:
>> show_operators
This command will display the following:
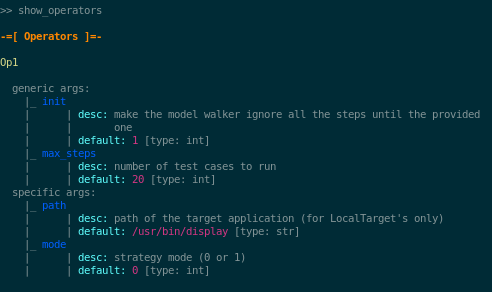
To launch the operator Op1 and limit to 5 the number of test cases to
run, issue the command:
>> launch_operator Op1(max_steps=5)
This will trigger the Operator that will execute the display
program with the first generated JPG file. It will look at stdout
and stderr for error messages, or look for any crashes, and if
such a situation occurs, will save the related JPG file under
exported_data/jpg/ and log everything under logs/. It will
also try to avoid saving JPG files that trigger errors whose type has
already been seen. Once the operator is all done with this first test
case, it can plan the next actions it needs fuddly to perform for
it. In our case, it will go on with the next iteration of a disruptor
chain, basically JPG(finite=True) tTYPE.
2.1.4. Replay Data From a Previous Session
If you want to replay some data previously sent, you can either use the workspace where each
emitted data are registered (in memory only) during a fuddly session, or if you quit fuddly
in-between you can reload data from the fuddly database fmkDB.db (SQLite3).
To resend the data you just sent, issue the following command:
>> replay_last
But if you want to resend any data from the workspace you first have to store it to the Data Bank. To save the data you just sent, issue the following command:
>> register_last
To save all the workspace in the Data Bank, issue the following command:
>> register_wkspace
Then, if you want to look at the Data Bank, issue the command:
>> show_db
You will then be able to resend any data from the Data Bank thanks to its entry number (that is displayed by the previous command). For instance, if you want to resend the data registered in the 5th entry of the Data Bank, issue the command:
>> replay_db 5
Finally, if you want to resend data from previous sessions, you can do it by looking at the
DATA table of the fmkDB.db, looking for the IDs that match the data you want to resend and use the command
fmkdb_fetch_data. Let’s say you want to load the data from ID 32 to ID 105, you will issue the following command:
>> fmkdb_fetch_data 32 105
That command will store these data to the Data Bank. From then on, you could use show_db and replay_db
as previously explained.
Note
You can use disruptors with a replay_* command. However if these disruptors are stateful,
you should issue the command only once. Then, if you want to walk through the stateful disruptor,
you only have to switch to a send-like command, and use as generator name the string NOGEN
For instance:
>> replay_last tTYPE
>> send_loop -1 NOGEN tTYPE
2.2. Using fuddly Through Advanced Python Interpreter
To use fuddly within any python interpreter like ipython, you
will need to issue the following commands:
1from framework.plumbing import *
2
3fmk = FmkPlumbing()
4fmk.start()
From now on you can use fuddly through the
object fmk. Every commands defined by Fuddly Shell (refer to
Start a Fuzzing Session) are backed by a method of the class
framework.plumbing.FmkPlumbing.
Here under some basic commands to launch the project tuto, a virtual testing target and the
ZIP data model:
 1# To show the available projects
 2fmk.show_projects()
 3
 4# Contains the list of all the Project objects available
 5fmk.prj_list
 6
 7# Load the ``tuto`` project by name
 8fmk.load_project(name='tuto')
 9
10# Reference to the currently launched project, in our case ``tuto``
11fmk.prj
12
13# Show available targets for this project
14fmk.show_targets()
15
16# Select the target with ID ``7``
17fmk.load_targets(7)
18
19# To show all the available data models
20fmk.show_data_models()
21
22# Contains the list of all the DataModel objects available
23fmk.dm_list
24
25# Load the ZIP data model by name
26fmk.load_data_model(name='zip')
27
28# Reference to the currently loaded data model, in our case the ZIP one
29fmk.dm
30
31# Launch the project and all the related components
32fmk.launch()
Note
The previous commands used to load a project, targets and data models can be factorized in one line thanks to the following command:
# To launch the ``tuto`` project with the targets ID ``7`` and ``8``
# and the ZIP data model in one line
fmk.run_project(name='tuto', tg_ids=[7,8], dm_name='zip')
You can also change the timeout value used to retrieved feedback from the targets, as well as tuning the way this value has to be considered (a maximum value or a strict time slice).
1fmk.set_feedback_timeout(1, tg_id=7)
2fmk.set_feedback_mode(Target.FBK_WAIT_UNTIL_RECV, tg_id=7)
3fmk.set_feedback_timeout(2, tg_id=8)
4fmk.set_feedback_mode(Target.FBK_WAIT_FULL_TIME, tg_id=8)
The effect of this commands is summarized in a specific screen that can be displayed by issuing the
command fmk.show_fmk_internals():
-=[ FMK Internals ]=-

  [ General Information ]
                  FmkDB enabled: True
              Workspace enabled: True
                  Sending delay: 0.0
   Number of data sent in burst: 1
 Target(s) health-check timeout: 4.0

  [ Target Specific Information - (7) TestTarget [ID: 792104] ]
               Feedback timeout: 1
                  Feedback mode: Wait until the target has sent something back to us

  [ Target Specific Information - (8) TestTarget [ID: 792160] ]
               Feedback timeout: 2
                  Feedback mode: Wait for the full time slot allocated for feedback retrieval
Other commands allowing you to perform some user code changes either in the project file or the data models and take them into account without restarting fuddly:
1# Reload all sub-systems and data model definitions and choose the target ``0``
2fmk.reload_all(tg_num=0)
3
4# Reload the data model definitions
5fmk.reload_dm()
Then, when everything is loaded, the following commands is an example on how target interaction can be performed:
 1# Show a list of the registered data type within the data model
 2fmk.show_atom_identifiers()
 3# Or
 4list(fmk.dm.atom_identifiers())
 5
 6# Get an instance of the modeled data ZIP_00 which is made from the
 7# absorption of an existing ZIP archive within <fuddly data folder>/imported_data/zip/
 8dt = fmk.dm.get_atom('ZIP_00')
 9
10# Display the raw contents of the first generated element of the data type `dt`
11# Its the flatten version of calling .get_value() on it. Note that doing so will
12# freeze the data type to the generated output, no matter how many times you call
13# these method on it
14dt.to_bytes()
15
16# Pretty print the current value. (if the data type is not already frozen,
17# it will call g.get_value() on it)
18dt.show()
19
20# Unfreeze the data type to get a new value and then display it
21dt.unfreeze()
22dt.show()
23
24# Send the current data, log it and save it
25fmk.send_data_and_log(Data(dt))
26
27# Perform a tTYPE disruption on it, but give the 5th generated
28# cases and enforce the disruptor to strictly follow the ZIP structure
29# Finally truncate the output to 200 bytes
30action_list = [('tTYPE', UI(init=5, order=True)), ('SIZE', UI(sz=200))]
31altered_data = fmk.process_data(action_list, seed=Data(dt))
32
33# Send this new data and look at the actions that perform tTYPE and
34# SIZE through the console or the logs
35fmk.send_data_and_log(altered_data)
The last command will display something like this (with some color if
you have the xtermcolor python library):
====[ 3 ]==[ 27/06/2019 - 12:07:19 ]============================================
### Step 1:
 |- disruptor type: tTYPE | disruptor name: sd_fuzz_typed_nodes | User input: [init=5,order=True]
 |- data info:
    |_ model walking index: 4
    |_  |_ run: 4 / -1 (max)
    |_ current fuzzed node:     ZIP_00/file_list/file/header/common_attrs/version_needed
    |_  |_ value type:          <framework.value_types.UINT16_le object at 0x7f2bcd49b160>
    |_  |_ original node value (hex): b'1403'
    |_  |                    (ascii): b'\x14\x03'
    |_  |_ corrupt node value  (hex): b'0000'
    |_                       (ascii): b'\x00\x00'
### Step 2:
 |- disruptor type: SIZE | disruptor name: d_max_size | User input: [sz=200]
 |- data info:
    |_ orig node length: 595
    |_ right truncation
    |_ new node length: 200
### Data size: 200 bytes
### Emitted data is stored in the file:
<fuddly data folder>/exported_data/zip/2019_06_27_120719_00.zip
### FmkDB Data ID: 542

### Ack from 'TestTarget [ID: 725768]' received at: 2019-06-27 12:07:19.071751
### Feedback from 'TestTarget [ID: 725768]' (status=0):
CRC error
The previous commands can be factorized through the method
framework.plumbing.FmkPlumbing.process_data_and_send()
For instance fuzzing the targets 7 and 8 simultaneously (that handle ZIP format) until exhaustion of test cases can be done thanks to the following lines:
1 # Hereunder the chosen fuzzing follow a 2-step approach:
2 # 1- the disruptor tTYPE is called on the seed and starts from the 5th test case
3 # 2- a trailer payload is added at the end of what is generated previsouly
4
5 dp = DataProcess([('tTYPE', UI(deep=True, init=5)),
6                   ('ADD', UI(raw='This is added at the end'))],
7                  seed='ZIP_00')
8
9 fmk.process_data_and_send(dp, max_loop=-1, tg_ids=[7,8])
We did not discuss all the methods available from framework.plumbing.FmkPlumbing`but you
should now be more familiar with :class:`framework.plumbing.FmkPlumbing and go on with its exploration.
Finally, in order to exit the framework, the following method should be called (otherwise, various threads would block the correct termination of the framework):
fmk.stop()
For more information on how to manually make modification on data, refer to the section Defining Specific Disruptors
2.3. Implementing a Data Model and Defining a Project Environment
2.3.1. Data Modeling
2.3.1.1. Overview
Within fuddly data representation is performed through the description of a directed acyclic graph whose terminal nodes describe the different parts of a data format and the arcs—which can be of different kinds—capture its structure. This graph includes syntactic and semantic information of the data format. Using a graph as a data model enables to represent various kind of data format with flexibility. By flexibility we mean the possibility to mix accurate representations for certain aspects with much coarser ones for others—e.g., modeling accurately only the data parts which are assumed to be complex to handle by the target—and a high-level of expressiveness.
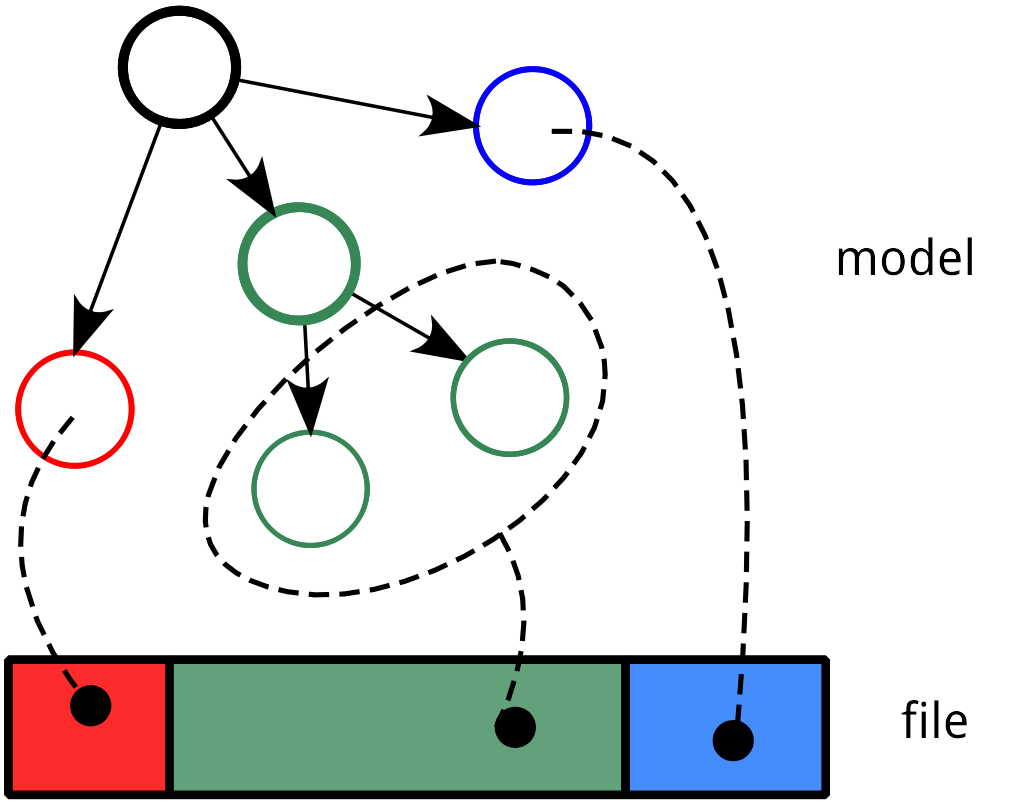
Data Representation
From this model, data can be generated (look at the figure Data Generation) and existing raw data can be absorbed. This latter operation is a projection of the existing raw data within the data model (see the example ZIP archive modification and also the section Absorption of Raw Data that Complies to the Data Model). Data generation allows to create data that conforms to the model if we want to iteract correctly with the target, or to create degenerate data if we want to assess target robustness. Data absorption can allow to generate data from existing ones if the model is not accurate enough to generate correct data by itself; or to understand the target outputs in order to interact correctly with it or not.
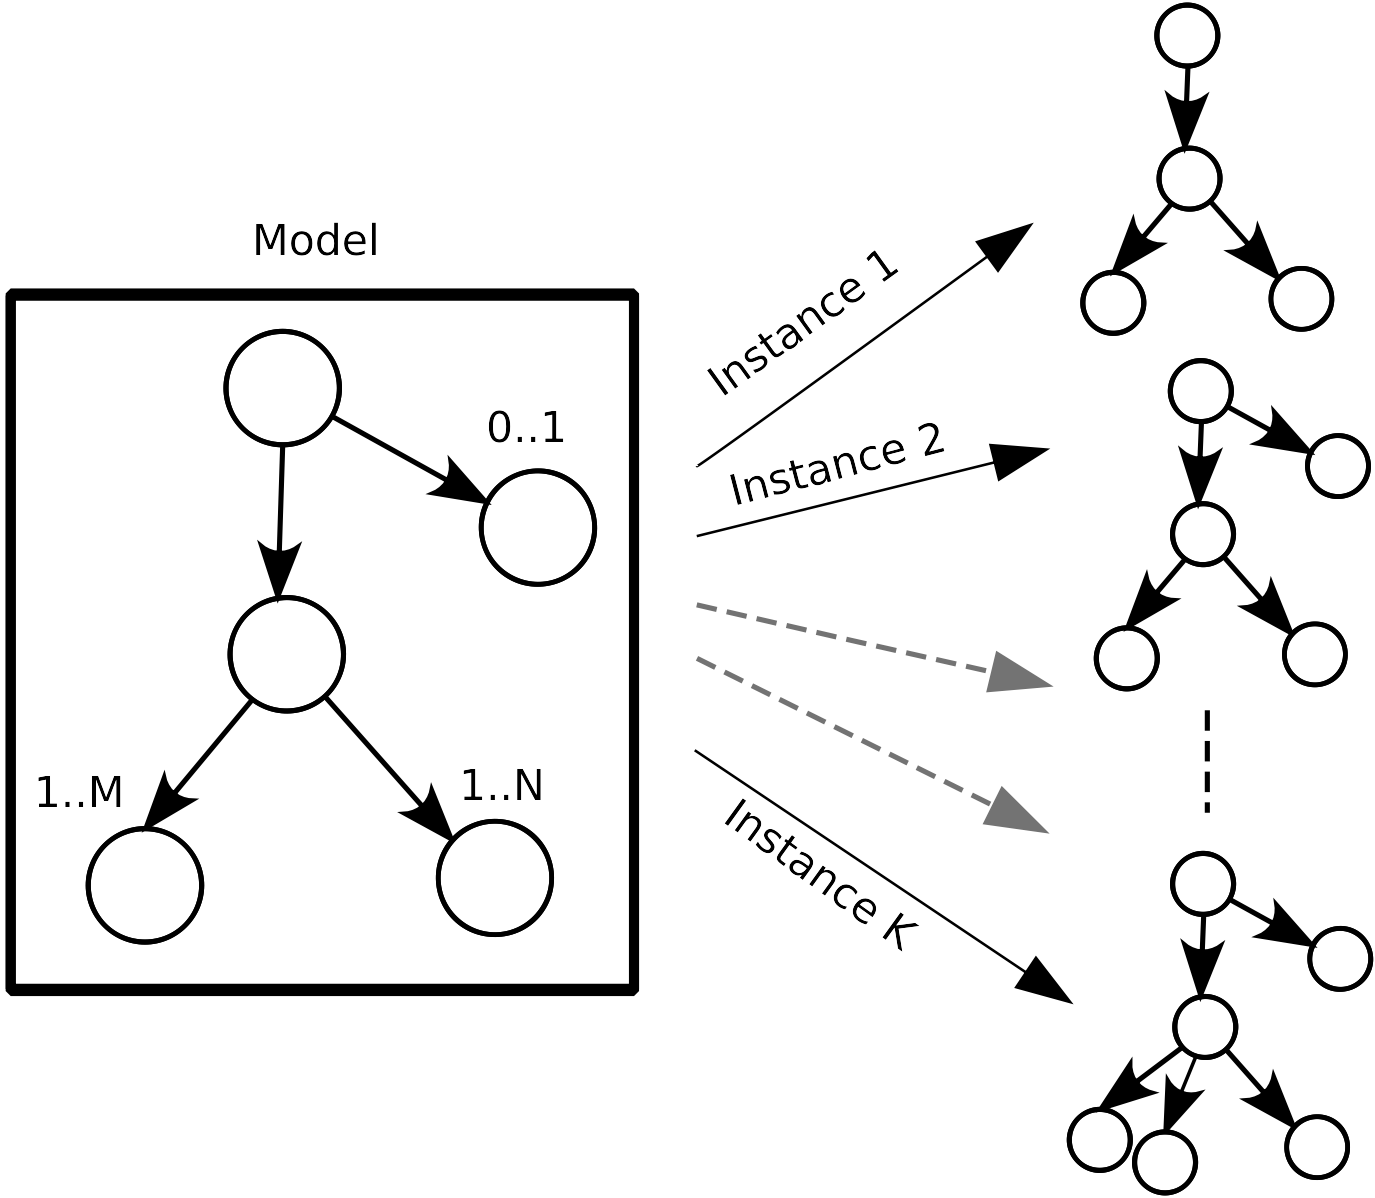
Data Generation
Generating data boils down to walk the graph that model the data format. After each traversal, a data is produced and each traversal make the graph evolving, in a deterministic or random way depending on your intent. Graph walking is also a way to perform node alteration on the fly (through entities called disruptors).
See also
Refer to Defining Specific Disruptors to learn how to perform
modification of data generated from the model. Refer to
How to Perform Automatic Modification on Data in order to play with existing
generic disruptors within the frame of the fuddly
shell.
Different kinds of node are defined within fuddly in order to model data:
Terminal nodes with typed-value contents (e.g.,
UINT16,BitField,String, …)Non-terminal nodes that are used to define the data format structure. They put in order the different parts of a data format, and can even specify a grammar to express a more complex assembly.
Generator nodes that are used to dynamically generate a part of the graph according to other nodes (from within the graph itself or not) and/or other criteria provided as parameters.
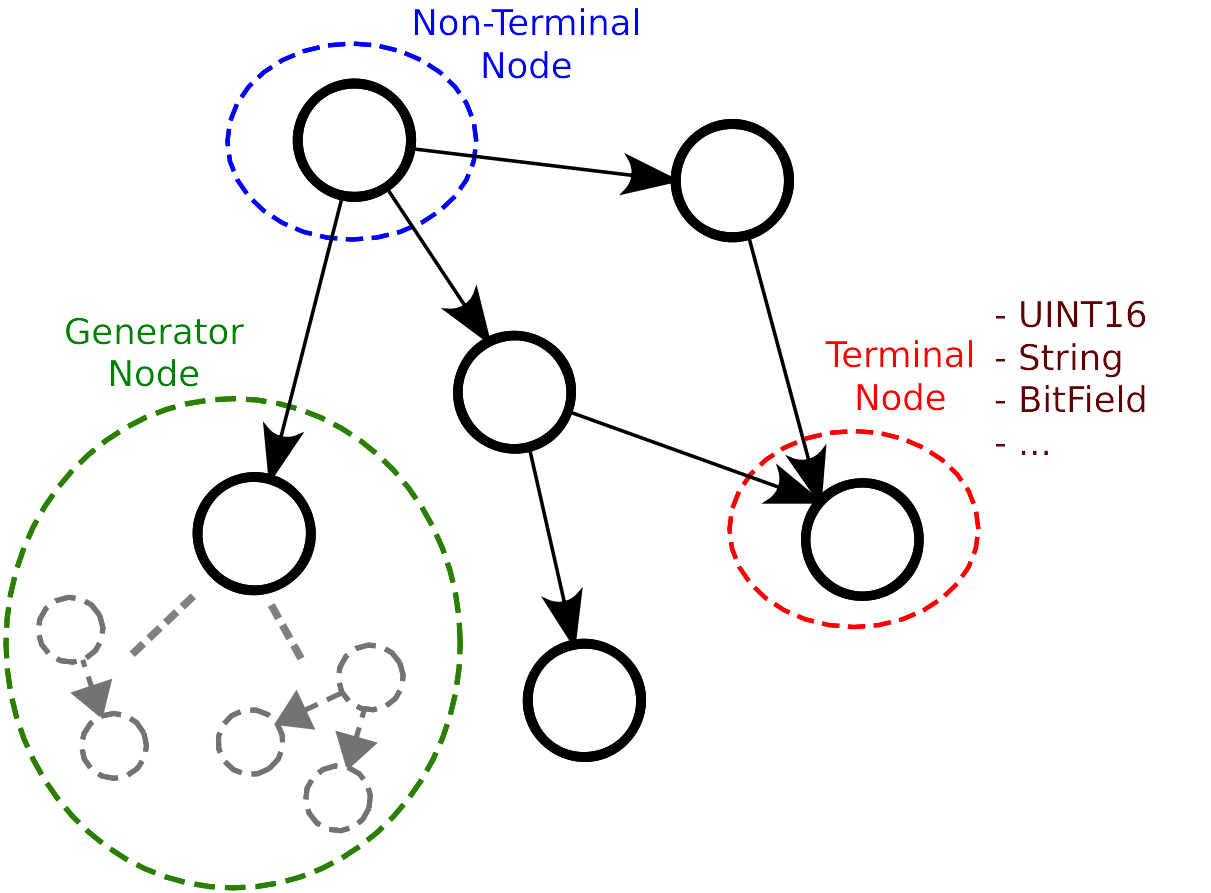
Node Types
The structure of a data format is grasped by the links between the
graph nodes. Within fuddly data model, we distinguish three kinds
of links:
Parent-child links which define a basic structure between the graph nodes. They are ruled by non-terminal nodes.
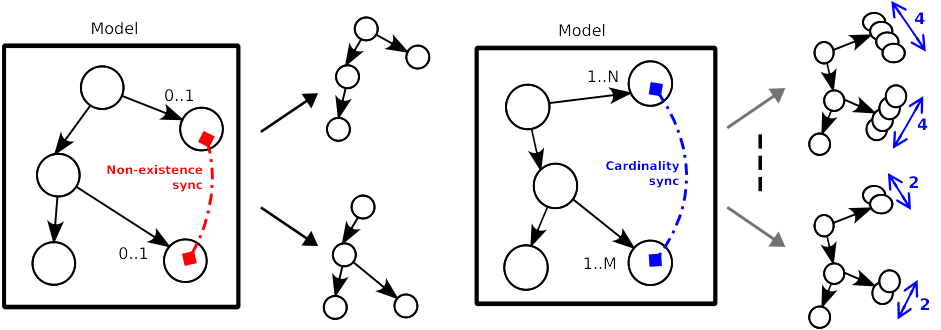
Links associated to specific criteria that condition some part of the graph. For instance, node generation can be associated to the existence of another one; different node set can be synchronized relatively to their cardinality.
Node Constraints
Links defined between generator nodes and their parameter nodes. They are especially useful when a complex relationship exist between multiple nodes. The generator nodes are then used to rule this relationship by defining it through a function.
Additionally, for each node can be defined alternative configurations, enabling for instance to dynamically change a terminal node in a non-terminal node or a generator node. These configurations can be added dynamically and switched at any times even during the graph traversal. This feature can be leveraged to capture different facets of a data format within the same data model; while offering the possibility to work on only one view at a time. It can also be useful for absorption. Indeed, this operation can require to model some part of the data format in a way different from the one took on for the generation. The alternative configurations enable to aggregate these differences within the same data model.
Finally, it is also possible to associate various kind of attributes to the nodes:
classic ones like Mutable, Determinist, Finite, …
semantic ones that allows to group nodes based on some specific meanings (for instance a PDF page), in order to enable higher level data manipulation.
user-defined ones for specifying specific semantics to the nodes to enable enhanced data modification.
2.3.1.2. A First Example
In order to create a data model, fuddly’s low-level primitives can
be used, or more simply the high-level infrastructure that create the
model from kind of JSON representation. For complex case, the two
approaches could be complementary. Moreover data models can also use
other data models whether the need arises.
Let’s look at the following example which is a limited description of the PNG data format:
 1png_desc = \
 2{'name': 'PNG_model',
 3 'contents': [
 4    {'name': 'sig',
 5     'contents': String(values=[b'\x89PNG\r\n\x1a\n'], size=8)},
 6    {'name': 'chunks',
 7     'qty': (2,-1),
 8     'contents': [
 9          {'name': 'len',
10           'contents': UINT32_be()},
11          {'name': 'type',
12           'contents': String(values=['IHDR', 'IEND', 'IDAT', 'PLTE'], size=4)},
13          {'name': 'data_gen',
14           'contents': lambda x: Node('data', value_type= \
15                      String(size=x[0].get_raw_value())),
16           'node_args': ['len']},
17          {'name': 'crc32_gen',
18           'contents': CRC(vt=UINT32_be, clear_attrs=[MH.Attr.Mutable]),
19           'node_args': ['type', 'data_gen']}
20     ]}
21 ]}
In short, we see that the root node is PNG_model, which is the
parent of the terminal node sig representing PNG file signature
(lines 4-5) and the non-terminal node chunks representing the
file’s chunks (lines 6-20) 1. This latter node describe the PNG
file structure by defining the chunk contents in lines 9-19—in this very
simplistic data model, chunk types are not distinguished, but it can
easily be expanded—and the number of chunks allowed in
a PNG file in line 7—from 2 to -1 (meaning infinity).
See also
For detailed information on how to describe a data format and getting the list of the usable keywords refer to Data Model Patterns and Data Model Keywords.
2.3.1.3. Defining the Imaginary MyDF Data Model
Assuming we want to model an imaginary data format called MyDF. Two
files need to be created either within <root of fuddly>/data_models/ or within
<fuddly data folder>/user_data_models/ (or within any subdirectory):
mydf.pyContain the implementation of the data model related to
MyDFdata format, which is the topic of the current section.mydf_strategy.pyContain optional disruptors specific to the data model (Defining Specific Disruptors)
By default, fuddly will use the prefix mydf for referencing
the data model. But it can be overloaded within the data model
definition, as it is done in the following example (in line 8) which
is a simple skeleton for mydf.py:
 1from framework.node import *
 2from framework.value_types import *
 3from framework.data_model import *
 4
 5class MyDF_DataModel(DataModel):
 6
 7   file_extension = 'myd'
 8   name = 'overload_default_name_if_you_wish'
 9
10   def build_data_model(self):
11
12      # Data Type Definition
13      d1 = ...
14      d2 = ...
15      d3 = ...
16
17      self.register(d1, d2, d3)
18
19
20data_model = MyDF_DataModel()
Note
All elements discussed during this tutorial, related to the
data model mydf, are implemented within tuto.py and
tuto_strategy.py. Don’t hesitate to play with what are
defined within, Either with ipython or Fuddly Shell
(Start a Fuzzing Session).
In this skeleton, you can notice that you have to define a class that
inherits from the framework.data_model.DataModel class,
as seen in line 5. The definition of the data types of a data format
will be written in python within the method
framework.data_model.DataModel.build_data_model(). In
the previous listing, the data types (also called atoms) are represented by d1, d2
and d3. Once defined, they should be registered within the data
model, by calling
framework.data_model.DataModel.register() on them.
Note
In the frame of your data model if you want to instantiate atoms from samples:
Add your samples there:
<fuddly data folder>/imported_data/<NAME of DM>/Within the method
framework.data_model.DataModel.build_data_model(), and once you defined your atoms, call the methodframework.data_model.DataModel.register_atom_for_decoding()to register the atom that will be used to model your samples. (To perform this action the framework leverages the node absorption mechanism – Absorption of Raw Data that Complies to the Data Model.) For a usage example, refer to the ZIP data model.Finally, the next time you load your data model, you will have your samples absorbed and available through specific Generators automatically created for you.
If you need more flexibility in this sample absorption process, you should overwrite
the method framework.data_model.DataModel._atom_absorption_additional_actions() as illsutrated
by the JPG data model.
Finally, if you need even more flexibility in order to create atoms from samples, because
node absorption is not satisfactory in your context, then you could overload the method
framework.data_model.DataModel._create_atom_from_raw_data_specific().
Refer to the JSON data model for an illustration, where this method is overloaded in order to create
either atoms that represent JSON schemas or atoms that model some JSON data; depending on the JSON
files provided in <fuddly data folder>/imported_data/json.
Note
The method framework.data_model.DataModel.register_atom_for_decoding() is also leveraged
by the decoding feature of the class framework.data_model.DataModel, which is implemented
by the method framework.data_model.DataModel.decode().
Indeed, the decoding feature will look for a valid atom for performing the absorption of the provided binary string in order to be able to decode it. And this search depends on the atoms you registered.
The data model decoding feature can be used for different purposes. It is leveraged for instance
by the Fmkdb toolkit (refer to Data Analysis).
For briefly demonstrating part of fuddly features to describe data formats, we take the following example whose only purpose is to mix various constructions, and value types.
See also
For a more thorough description of the patterns that can be used to describe data formats, refer to Data Model Patterns and Data Model Keywords.
See also
For a list and description of the currently defined value types refer to Value Types.
 1d1 = \
 2{'name': 'TestNode',
 3 'contents': [
 4
 5      # block 1
 6      {'section_type': MH.Ordered,
 7       'duplicate_mode': MH.Copy,
 8       'contents': [
 9
10           {'contents': BitField(subfield_sizes=[21,2,1], endian=VT.BigEndian,
11                                 subfield_values=[None, [0b10], [0,1]],
12                                 subfield_val_extremums=[[500, 600], None, None]),
13            'name': 'val1',
14            'qty': (1, 5)},
15
16           {'name': 'val2'},
17
18           {'name': 'middle',
19            'custo_set': MH.Custo.NTerm.FrozenCopy,
20            'custo_clear': MH.Custo.NTerm.MutableClone,
21            'contents': [{
22                'section_type': MH.Random,
23                'contents': [
24
25                    {'contents': String(values=['OK', 'KO'], size=2),
26                     'name': 'val2',
27                     'qty': (1, -1)},
28
29                    {'name': 'val21',
30                     'clone': 'val1'},
31
32                    {'name': 'USB_desc',
33                     'import_from': 'usb',
34                     'data_id': 'STR'},
35
36                    {'contents': lambda x: Node('cts', values=[x[0].to_bytes() \
37                                                       + x[1].to_bytes()]),
38                     'name': 'val22',
39                     'node_args': [('val21', 2), 'val3']}
40                ]}]},
41
42           {'contents': String(max_sz = 10),
43            'name': 'val3',
44            'sync_qty_with': 'val1',
45            'alt': [
46                {'conf': 'alt1',
47                 'contents': SINT8(values=[1,4,8])},
48                {'conf': 'alt2',
49                 'contents': UINT16_be(min=0xeeee, max=0xff56),
50                 'determinist': True}]}
51       ]},
52
53      # block 2
54      {'section_type': MH.Pick,
55       'weights': (10,5),
56       'contents': [
57           {'contents': String(values=['PLIP', 'PLOP'], size=4),
58            'name': 'val4'},
59
60           {'contents': SINT16_be(values=[-1, -3, -5, 7]),
61            'name': 'val5'}
62       ]},
63
64      # block 3
65      {'section_type': MH.FullyRandom,
66       'contents': [
67           {'contents': String(values=['AAA', 'BBBB', 'CCCCC']),
68            'name': ('val21', 2)},
69
70           {'contents': UINT8(values=[2, 4, 6, 8]),
71            'qty': (2, 3),
72            'name': ('val22', 2)}
73       ]}
74  ]}
At first glance, the data model is composed of three parts: block 1 (lines 6-50), block 2 (lines 53-61) and block 3 (lines 64-72). Within these blocks, various constructions are used. Below, some insights:
- line 6, line 22, line 54, line 65
The keyword
section_typeallows to choose the order to be enforce by a non-terminal node to its children.MH.Orderedspecifies that the children should be kept strictly in the order of the description.MH.Randomspecifies there is no order to enforce between any node blocks (we intend by block the set of all the nodes that could be generated from a unique description block like in line 25-27), except if the parent node has thedeterministattribute.MH.FullyRandomspecifies there is no order to enforce between every single nodes.MH.Pickspecifies that only one node among the children should be kept at a time—the choice is randomly performed except if the parent has thedeterministattribute—as per the weight associated to each child node (weights, line 55).- lines 10-14
A terminal node with typed-value contents is defined. It is a
BitField. This node have an attribute'qty': (1,5)(line 14) which specifies that it can be present from 1 to 5 times. (Note that, by default, raw data absorption will also be constrained by this limit)- line 16
This pattern allows to use an already defined node. In our case, it is the node
val2specified in lines 24-26.- lines 29-30
This pattern with the keyword
cloneallows to make a full copy of an existing node.- lines 32-34
The keywords
import_fromanddata_idare used for importing a data type from another data model. In this case it is aSTRING Descriptordata type from theUSBdata model.- lines 36-39
Here is defined a generator nodes. It takes two nodes of the current graph as parameters, namely:
(val21, 2)andval3. It simply create a new node with a value equal to the contents of its node parameters.Note
The syntax
(X, nb)—as illustrated by(val21, 2)—allows to use within the description the same nameXfor different nodes having different parents while being able to reference them uniquely—thanks tonb—as illustrated by this generator node.- lines 45-50
Two alternate configurations of node
val3are specified through this pattern.- lines 44
The keyword
sync_qty_withallows to synchronize the number of nodes to generate or to absorb with the one specified by its name. In this case it is the nodeval1which is defined in lines 10-14.
To register such a description within the data model MyDF you can
directly use framework.data_model.DataModel.register()
as seen in the previous example. But if you want to access afterwards
to the defined nodes, you can also transform this description to a
graph, before registering it, like this:
1nb = NodeBuilder(self)
2root_node = nb.create_graph_from_desc(d1)
You could then access to all the registered nodes tided up in the
specific dictionary mb.node_dico, whether you want to perform
extra operation on them.
See also
In order to make easier the modeling of data formats, some helpers are provided, namely: some generator-node templates (refer to Generator Node Templates) and some block builders (refer to Block Builders).
- 1
These chunks are information blocks that compose every PNG file.
2.3.2. Visualization of Modeled Data
Let’s show how to visualize an instance of the imaginary TestNode data
model we just described in section Defining the Imaginary MyDF Data Model. It is only a matter
of calling the method .show() on it, which will draw in ASCII what
can be seen on the figure TestNode Visualization.
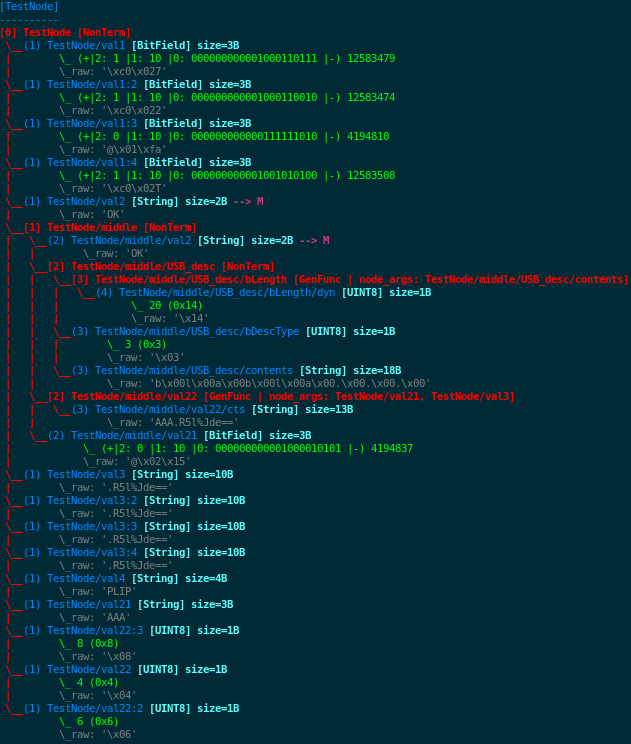
TestNode Visualization
Note
You can notice that the graph paths of the modeled data are
presented in a similar form as Unix file paths (for
instance TestNode/middle/val2). As it is explained in
the section Defining Specific Disruptors, using these paths are a
typical way for referencing a node within a modeled data.
2.3.3. Absorption of Raw Data that Complies to the Data Model
2.3.3.1. A First Example
Let’s begin with a simple example on how to absorb raw data that will match the imaginary TestNode data model we just described in section Defining the Imaginary MyDF Data Model.
 1from framework.plumbing import *
 2
 3fmk = FmkPlumbing()
 4
 5fmk.run_project(name="tuto")
 6
 7data_gen = fmk.dm.get_atom('TestNode')    # first instance of TestNode data model
 8data_abs = fmk.dm.get_atom('TestNode')  # second instance of TestNode data model
 9
10raw_data = data_gen.to_bytes()
11print(raw_data)
In our case, this code block output the following:
'\xc0\x027\xc0\x022@\x01\xfa\xc0\x02TOKOK\x14\x03b\x00l\x00a\x00b\x00l\x00a\x00.\x00.\x00.\x00AAA.R5l%Jde==@\x02\x15.R5l%Jde==.R5l%Jde==.R5l%Jde==.R5l%Jde==PLIPAAA\x08\x04\x06'
(Note that if you execute that on your side you will maybe get something else, as there is some random in this data model.)
And if we want to visualize it more gracefully, we can simply write
data_gen.show() which will draw in ASCII what can be seen on the
figure TestNode Visualization.
Note
You can remark that we have instanciated twice the TestNode
data model in line 7 and 8. The first one referenced by data_gen
was used to generate the previous raw data while the second one
referenced by data_abs will be used in what follows to
demonstrate absorption.
In order to absorb what have been previously generated, we will use the
second data model instance data_abs and will call its
.absorb() method with the previous generated data:
1data_abs.absorb(raw_data)
The following tuple will be returned:
(<AbsorbStatus.FullyAbsorbed: 4>, 0, 102, 'TestNode') # --> (status, offset, size, name)
The status is <AbsorbStatus.FullyAbsorbed: 4> which means that everything went well, that is,
all the provided data has been absorbed. The offset and size give
the part of the data that has been absorbed. In our case, it maps the
full length of the original data, namely 102 bytes.
Finally, if you call the method .show() on the model instance
data_abs you will see the same ASCII representation as the
original one depicted by TestNode Visualization.
2.3.3.2. Absorption Constraints
Absorption constraints can be configured in order to accept data that does not conform completely to the defined data model, which can be helpful if this data model does not specify every aspects of a data format, or if you want to voluntarily step outside the data format requirements.
By default, when you perform an absorption, every data model
constraints will be enforce. If you want to free some ones, you need
to provide a framework.node.AbsCsts object—specifying the constraints you
want—when calling the method .absorb().
Currently, there is four kinds of constraints:
sizeIf size matters for some nodes—for instance if
String()size attributes are specified within a terminal node—this constraint control it.contentOnly the values specified in the data model are accepted
similar_contentThis constraint is a lighter version of
content. It allows values similar to the one defined in the data model to be accepted in absorption operations. This is especially leveraged by String() to distinguish case sensitive from case incensitive strings.regexpThis constraint control if regular expression—that some terminal nodes can specify—should be complied to.
structThis constraint control whether or not data structure should be complied to. That covers part of the grammar specified through non-terminal nodes: quantity of children, quantity synchronization (specified through
sync_qty_withattribute), and existence synchronization—specified throughexists_iforexists_if_notattribute.
There is also the shortcuts framework.node.AbsNoCsts and
framework.node.AbsFullCsts which respectively set no
constraints, or all constraints. Thus, if you want to only respect
size and struct constraints, you can provide the object
AbsNoCsts(size=True,struct=True) to the .absorb() method, like
what follows:
status, off, size, name = data_abs.absorb(data, constraints=AbsNoCsts(size=True,struct=True))
In some cases, it could also be useful to only set absorption
constraints to some nodes. To do so, you can call the method
framework.node.Node.enforce_absorb_constraints() on the
related nodes with your chosen constraints. You can also add a
specific field absorb_csts (refer to Data Model Keywords and
Data Model Patterns) within a data model description to reach the same
objective.
2.3.3.3. Defining Absorption Helpers
For complex scenario of absorption, the constraints defined within the data model are not always sufficient. In such cases you could add helpers to the related nodes. Let’s say you want to model something like that:
 1split_desc = \
 2{'name': 'test',
 3 'contents': [
 4
 5     {'name': 'prefix',
 6      'contents': UINT8(values=[0xcc, 0xff, 0xee])},
 7
 8     {'name': 'variable_string',
 9      'contents': String(max_sz=20)},
10
11     {'name': 'keycode',
12      'contents': UINT16_be(values=[0xd2d3, 0xd2fe, 0xd2aa])},
13
14     {'name': 'variable_suffix',
15      'contents': String(values=['END', 'THE_END'])}
16 ]}
It works as intended for data generation, but if you want to absorb a
data that comply to this model, you will currently need to help
fuddly a little, as the node variable_string could be too
greedy and absorb the keycode whether the raw data to absorb
contains a variable_string strictly below the limit of the
specified 20 characters, like this:
\xffABCDEF\xd2\xfeTHE_END
To help fuddly making the right things, you could define an helper
function and associate it to the keycode node as illustrated in
what follows:
 1def keycode_helper(blob, constraints, node_internals):
 2    off = blob.find(b'\xd2')
 3    if off > -1:
 4        return AbsorbStatus.Accept, off, None
 5    else:
 6        return AbsorbStatus.Reject, 0, None
 7
 8split_desc = \
 9{'name': 'test',
10 'contents': [
11
12     {'name': 'prefix',
13      'contents': UINT8(values=[0xcc, 0xff, 0xee])},
14
15     {'name': 'variable_string',
16      'contents': String(max_sz=20),
17      'set_attrs': [NodeInternals.Abs_Postpone]},
18
19     {'name': 'keycode',
20      'contents': UINT16_be(values=[0xd2d3, 0xd2fe, 0xd2aa]),
21      'absorb_helper': keycode_helper},
22
23     {'name': 'variable_suffix',
24      'contents': String(values=['END', 'THE_END'])}
25 ]}
Notice that we also add a specific attribute to the node
variable_string, namely: NodeInternals.Abs_Postpone. This will
instruct fuddly to postpone any absorption corresponding to this
node, awaiting that the next node first find in the raw data what he
wants. Now, if we look at the keycode_helper() function, we can
notice that it has access to part of the raw data (the one that still
need to be consumed/absorbed) through its blob parameter. It
basically looks for a byte with the value \xd2. If it finds it, it
will return a success status as well as the offset where it wants to
start absorption (in this case it is the offset of what it
finds). Note, that the last value returned in the tuple is a size
attribute. In this case it is set to None, but it can enforce the
size of what should be absorbed in what remains in the raw data (could
be useful for instance for String()).
Now if you try to absorb the previous raw data, it will work as
expected. This example is voluntarily simple enough to better grasp
what is the purpose of having a helper. It could be legitimately
expected that in this case fuddly do it by itself, and in fact it
is currently able to do so ;) thanks to some already defined
absorb_auto_helpers methods. Thus, in this example you could
remove the helper stuff, while still keeping the
NodeInternals.Abs_Postpone attribute on the node
variable_string, and everything will work as expected.
Note
NodeInternals.Abs_Postpone allows to postpone the node absorption until the next node
successfully absorbs part of the provided data. If this latter node fails, the postponed absorption
will also fail.
See also
The already defined auto-helper functions, behave
accordingly to the typed value contents. They are more
elaborated than the example helper function defined
above. Look at the code
framework.value_types.INT.absorb_auto_helper()
and/or
framework.value_types.String.absorb_auto_helper()
in order to better understand how it works.
Even if fuddly can handle by itself this classic cases, you
could face situations where absorption will really not be so obvious
(whether you didn’t put sufficient constraints within the data model,
or because you don’t want to for letting more freedom during data
generation).
2.3.4. Describing Protocols Ruling a Data Model
Two compementary options are provided by the framework:
The Scenario Infrastructure that enables you to have access to automatically-created Generators that comply to the protocols you described. Refer to Scenario Infrastructure.
The definition of Virtual Operators. refer to Defining Operators
2.3.5. Defining Specific Disruptors
See also
For insights on how to manipulate data, refer to Data Manipulation.
2.3.5.1. Overview
Specific disruptors have to be implemented within mydf_strategy.py. This file should
starts with:
1from framework.plumbing import *
2from framework.tactics_helper import *
3
4tactics = Tactics()
Note
Fuddly registers for each data model the related
dynamically-created generators, and if defined, specific
disruptors. For that purpose, an object
framework.tactics_helper.Tactics has to be instantiated and
referenced by the global variable tactics.
Then, to define a specific disruptor for your data model you basically
have to define a subclass of framework.tactics_helper.Disruptor
or framework.tactics_helper.StatefulDisruptor, and use the
decorator @disruptor on it to register it. The first parameter of
this decorator has to be the framework.tactics_helper.Tactics
object you declare at the beginning of mydf_strategy.py.
1@disruptor(tactics, dtype="DISRUPTOR_TYPE", weight=1)
2class disruptor_name(Disruptor):
3
4   def disrupt_data(self, dm, target, prev_data):
5
6        # Do something with prev_data
7
8        return prev_data
For stateful disruptor you also need to implement the method
framework.tactics_helper.StatefulDisruptor.set_seed(). It will be called
only when the disruptor needs a new data to consume. Thus, it will be
called the very first time, and then each time the disruptor notify
fuddly that it needs a new data to consume. This notification is
done by calling framework.tactics_helper.StatefulDisruptor.handover()
within framework.tactics_helper.StatefulDisruptor.disrupt_data(). The
following code block illustrates such kind of disruptor:
 1@disruptor(tactics, dtype="DISRUPTOR_TYPE", weight=1)
 2class disruptor_name(StatefulDisruptor):
 3
 4   def set_seed(self, prev_data):
 5       self.seed_node = prev_data.content
 6
 7   def disrupt_data(self, dm, target, data):
 8       new_node = do_some_modification(self.seed_node)
 9       if new_node is None:
10           data.make_unusable()
11           self.handover()
12       else:
13           data.update_from(new_node)
14           data.add_info('description of the modification')
15
16   return data
Note
Remark the call to the method
framework.data.Data.update_from() (line 13). Such
construction comes from the fact fuddly uses a data-model
independent container (framework.data.Data) for
passing modeled data from one sub-system to another. This container
is also used, for logging purpose, to register the sequence of
modifications performed on the data (especially the disruptor
chain— refer to How to Perform Automatic Modification on Data) and other things, such
as information retrieved from what a disruptor wants to report
(line 14), for instance, insights on the modifications it
performed.
You can also define parameters for your disruptor, by specifying the
args attribute of the decorator with a dictionary. This dictionary
references for each parameter of your disruptors a tuple composed of a
description of the parameter, its default value, and the type of the
value. The following example illustrates this use case, as well as the
way to access the parameters within the disruptor methods.
1@disruptor(tactics, dtype="DISRUPTOR_TYPE", weight=1,
2           args={'param_1': ('param_1 description', None, str),
3                 'param_2': ('param_2 description ', True, bool)})
4class disruptor_name(StatefulDisruptor):
5
6   def set_seed(self, prev_data):
7       do_stuff(self.param_1)
8       do_other_stuff(self.param_2)
2.3.5.2. The Model Walker Infrastructure
The model walker infrastructure can helps you if you want to define a stateful disruptor that performs operations on the provided data, for each of its node (or for specific nodes of interest), one node at a time.
Basically, the class framework.fuzzing_primitives.ModelWalker
takes a modeled data as a parameter and an instance of a subclass of
framework.fuzzing_primitives.NodeConsumerStub—acting like a
visitor but being able to modify the nodes it visits. This special
visitor has to establish the criteria of the nodes on which it is
interested in and it has to implement the method
framework.fuzzing_primitives.NodeConsumerStub.consume_node() to
perform the intended modification on such nodes.
Note
The Model Walker infrastructure will by default also consider the non-terminal nodes. And if the consumer is not interested on them, it will iterates on the different possible forms they can take (optional parts, various defined shapes, …), in order for the consumer to have the opportunity to act on the different shapes the data may have.
Also, note that if you want to iterate on the different
forms of a modeled data, you can use the disruptor tWALK
with the specific parameter nt_only set to
True. Refer to Generic Disruptors.
Let’s take the following generic consumer
framework.fuzzing_primitives.SeparatorDisruption, that
replaces, one at a time, every separators of a modeled data with
another inappropriate separator.
 1class SeparatorDisruption(NodeConsumerStub):
 2
 3    def init_specific(self, separators):
 4        self._internals_criteria = \
 5            dm.NodeInternalsCriteria(mandatory_attrs=[dm.NodeInternals.Mutable, dm.NodeInternals.Separator],
 6                                     node_kinds=[dm.NodeInternals_Term])
 7
 8        self.values = [b'']
 9        if separators is not None:
10            self.values += list(separators)
11
12    def consume_node(self, node):
13        orig_val = node.to_bytes()
14        new_values = copy.copy(self.values)
15
16        if orig_val in new_values:
17            new_values.remove(orig_val)
18
19        node.import_value_type(value_type=vtype.String(values=new_values))
20    node.unfreeze()
21
22        node.make_finite()
23        node.make_determinist()
24
25        return True
In brief, at initialization, we define the kind of nodes on which we
are interested in doing some operations (line 4-6). We then register
the list of separator words allowed for this data. The core of our
modification is implemented within the method
framework.fuzzing_primitives.SeparatorDisruption.consume_node(),
which is called by the model walker each time it encounters a node of
interest, that is in our case a separator. In this method we change
the separator node such as it will expand as any separator words
except the legitimate one. After
framework.fuzzing_primitives.SeparatorDisruption.consume_node() is
called, the model walker will iterate over each defined shapes for
this node (by issuing continuously
framework.node.Node.get_value() then
framework.node.Node.unfreeze()) until exhaustion or after
a predefined limit.
Note
Saving and restoring the consumed nodes is performed
automatically by
framework.fuzzing_primitives.NodeConsumerStub, but
depending on your needs you can override the related
methods.
Finally, to make the Model Walker walks, you only have to instantiate
it with the intended parameters, and it will return an iterator. Thus,
for instance, you can display the result of the step-by-step
alterations of data_to_alter by executing the following code
snippet:
1 consumer = SeparatorDisruption()
2 for root_node, consumed_node, orig_val, idx in ModelWalker(data_to_alter, consumer):
3     print(root_node.to_bytes())
If we put all things together, we can write our separator disruptor
like this (which is a simpler version of the generic disruptor
framework.generic_data_makers.d_fuzz_separator_nodes):
 1@disruptor(tactics, dtype="tSEP", weight=1)
 2class disruptor_name(StatefulDisruptor):
 3
 4    def set_seed(self, prev_data):
 5        prev_data.content.get_value()
 6
 7        ic = dm.NodeInternalsCriteria(mandatory_attrs=[dm.NodeInternals.Separator])
 8        sep_list = set(map(lambda x: x.to_bytes(),
 9                           prev_data.content.get_reachable_nodes(internals_criteria=ic)))
10        sep_list = list(sep_list)
11
12        self.consumer = SeparatorDisruption()
13        self.walker = iter(ModelWalker(prev_data.content, self.consumer))
14
15    def disrupt_data(self, dm, target, data):
16        try:
17            rnode, consumed_node, orig_node_val, idx = next(self.walker)
18        except StopIteration:
19            data.make_unusable()
20            self.handover()
21            return data
22
23        data.update_from(rnode)
24
25        return data
2.3.6. Defining a Project Environment
The environment—composed of at least one target, a logger, and
optionnaly some monitoring means and virtual operators—is setup
within a project file located within <root of fuddly>/projects/ or within
<fuddly data folder>/user_projects/. To illustrate that let’s
show the beginning of generic/standard_proj.py:
 1from framework.project import *
 2from framework.monitor import *
 3from framework.operator_helpers import *
 4from framework.plumbing import *
 5import framework.global_resources as gr
 6
 7project = Project()
 8project.default_dm = ['mydf', 'zip']
 9# If you only want one default DM, provide its name directly as follows:
10# project.default_dm = 'mydf'
11
12logger = Logger(record_data=False, explicit_data_recording=False,
13                 export_raw_data=False)
14
15printer1_tg = PrinterTarget(tmpfile_ext='.png')
16printer1_tg.set_target_ip('127.0.0.1')
17printer1_tg.set_printer_name('PDF')
18
19local_tg = LocalTarget(tmpfile_ext='.png')
20local_tg.set_target_path('display')
21
22local2_tg = LocalTarget(tmpfile_ext='.pdf')
23local2_tg.set_target_path('okular')
24
25local3_tg = LocalTarget(tmpfile_ext='.zip')
26local3_tg.set_target_path('unzip')
27local3_tg.set_post_args('-d ' + gr.workspace_folder)
28
29net_tg = NetworkTarget(host='localhost', port=12345, data_semantics='TG1',
30                       hold_connection=True)
31net_tg.register_new_interface('localhost', 54321, (socket.AF_INET, socket.SOCK_STREAM),
32                              'TG2', server_mode=True, hold_connection=True)
33net_tg.add_additional_feedback_interface('localhost', 7777,
34                                         (socket.AF_INET, socket.SOCK_STREAM),
35                                         fbk_id='My Feedback Source', server_mode=True)
36net_tg.set_timeout(fbk_timeout=5, sending_delay=3)
37
38targets = [local_tg, local2_tg, local3_tg, printer1_tg, net_tg]
A project file should contain at a minimum:
a
framework.project.Projectobject (referenced by a variableproject)a
framework.logger.Loggerobject (Defining the Logger, referenced by a variablelogger)
and optionally:
targets (referenced by a variable
targets, Defining the Targets)scenarios (Scenario Infrastructure) that can be registered into a project through the method
framework.project.Project.register_scenarios()probes (Defining Probes)
tasks (Defining Tasks)
operators (Defining Operators)
A default data model or a list of data models can be added to the
project through its attribute default_dm. fuddly will use this
if the project is directly launched, that is either by issuing the
command run_project in the fuddly shell or by using the
method framework.plumbing.FmkPlumbing.run_project() through any
python interpreter.
Note
An framework.target_helpers.EmptyTarget is automatically
added by fuddly to any project, for dry runs. So it does
not matter if you don’t define a target at the beginning.
2.3.6.1. Defining the Targets
Many targets can be defined in a project file. They have to be
referenced within a list pointed by the global variable targets of
the project file.
Within the tutorial project (projects/tuto_proj.py), multiple
targets have been defined:
three different
framework.targets.local.LocalTargetfor interacting with local programs;a
framework.targets.printer.PrinterTargetto communicate with a CUPS server;and finally a
framework.targets.network.NetworkTargetthat is setup with two interfaces from which data can be sent to (and feedback retrieved from), plus an additional feedback source.
Note that the network target can route data depending on their
semantics (TG1, TG2) through the two created interfaces. And
for data without semantics it defaults to the first interface
(TG1).
The simplest way to play with this target is to use netcat as the
real target. Note that some interfaces has been setup in server mode,
that means that fuddly will send data when the target connects to
it. The following netcat instances will cover our needs:
[term1] # nc -l 12345

[term2] # nc localhost 54321

[term3] # nc localhost 7777
In order to play with the routing you can use the specific data 4TG1 and
4TG2 implemented for this purpose within the data model mydf.
See also
Refer to Generic Targets for details on the available generic targets that you can use directly or inherit from.
If you need to implement your own Target you have at least to
inherit from framework.target_helpers.Target and overload the method
framework.target_helpers.Target.send_data() which is called by
fuddly each time data is sent to the target. Additionally,
implementing framework.target_helpers.Target.send_multiple_data()
enables to send various data simultaneously to the target. If we take
the previous NetworkTarget example, all the registered interfaces can be
stimulated at once through this method.
See also
Other methods of framework.target_helpers.Target are
defined to be overloaded. Look at their descriptions to
learn more about what can be customized.
2.3.6.2. Defining the Logger
You should declare a framework.logger.Logger in your project
file, and specify the parameters that make sense for your
situation. The Logger will then be used by fuddly for keeping
history of your interaction with the target (e.g., data sent, feedback
received, …). Statistics about data emission will also be maintained
and kept in sync with the log files.
The outputs of the logger are of four types:
<fuddly data folder>/logs/*<project_name>_logs: the history of your test session for the project namedproject_name. The files are prefixed with the test session starting time. A new one is created each time you run a new project or you reload the current one. Note these files are created only if the parameterenable_file_loggingis set to True.<fuddly data folder>/logs/*<project_name>_stats: some statistics of the kind of data that has been emitted during the session. Note these files are created only if the parameterenable_file_loggingis set to True.<fuddly data folder>/exported_data/<data model name>/*.<data extension>: the data emitted during a session are stored within the their data model directory. Each one is prefixed by the date of emission, and each one is uniquely identified within the log files.records within the database
<fuddly data folder>/fmkDB.db. Every piece of information from the previous files are recorder with this database.
Some parameters allows to customize the behavior of the logger, such as:
record_datawhich control the location of where data will be stored. If set toFalse, instead of being stored in separate files as explained previously, they will be written directly within the log files (ifenable_file_loggingis set toTrue). This parameter does not interfere with data recording withinFmkDB.explicit_data_recording: which is used for logging outcomes further to anframework.operator_helpers.Operatorinstruction. If set toTrue, the operator would have to state explicitly if it wants the just emitted data to be recorded. Such instruction is typically used within its methodframework.operator_helpers.Operator.do_after_all(), where the Operator can take its decision after the observation of the target feedback and/or probes outputs.enable_file_loggingwhich is used to control the production of log files. If set toFalse, the Logger will only commit records to theFmkDB.
See also
Refer to Defining Operators to learn more about the interaction between an Operator and the Logger.
2.3.6.3. Defining Operators
In order to automatize what a human operator could perform to interact
with one or more targets, the abstracted class
framework.operator_helpers.Operator can be inherited. The purpose
of this class is to give you the opportunity to plan the operations
you want to perform on the target (data type to send, type of
modifications to perform on data before sending it, and so on). Thus,
you could embeds all the protocol logic to be able to adapt the
fuzzing strategy based on various criteria—e.g., monitoring
feedback, operator choices, and so on. By default, the operator is
recalled after each data emission to the target, but it can also
provide to fuddly a batch of instructions, that will be executed prior
to its recall. You have also the ability to stimulate the target
through its different I/O interfaces in parallel, while each of the
inputs followed a specific protocol. Obviously, a monitoring
infrastructure is available to support you during the decision
process.
See also
The monitoring infrastructure enables the creation of independent probes to watch or measure any kinds of parameters linked to the target or anything else. Refer to Defining Probes to learn how to create them.
See also
To implement the protocol logic you should leverage the Scenario Infrastructure. Refer to Scenario Infrastructure.
If ever the Scenario Infrastructure does not satisfy your need, using a full-fledged state machine library such as toysm should do.
To define an operator you have to define a class that inherits from
framework.operator_helpers.Operator. Then, to register it within
your project, the decorator @operator has to be used with at least
the reference of the project as the first parameter.
See also
Parameters can be defined for an operator, in order to
make it more customizable. The way to describe them is
the same as for disruptors. Look into the file
projects/generic/standard_proj.py for some examples.
Here under is presented a skeleton of an Operator:
 1@operator(project)
 2class MyOperator(Operator):
 3
 4    def start(self, fmk_ops, dm, monitor, target, logger, user_input):
 5        # Do some initialization stuff
 6        return True
 7
 8    def stop(self, fmk_ops, dm, monitor, target, logger):
 9        # Do some termination stuff
10
11    def plan_next_operation(self, fmk_ops, dm, monitor, target, logger, fmk_feedback):
12        op = Operation()
13
14        # Do some planning stuff and decide what would be the next
15        # operations you want fuddly to perform
16
17        return op
18
19    def do_after_all(self, fmk_ops, dm, monitor, target, logger):
20        linst = LastInstruction()
21
22        # Do some stuff after the planned Operation() has been
23        # executed and request fuddly to perform some last-minute
24        # instructions.
25
26        return linst
The methods framework.operator_helpers.Operator.start() and
framework.operator_helpers.Operator.stop() are the obvious ones
that you have to implement if you want to customize the
initialization and termination of your operator.
The core of your operator will be implemented within the method
framework.operator_helpers.Operator.plan_next_operation() which
will order fuddly to perform some operations based on the
framework.operator_helpers.Operation() object that you will return
to it. A basic example illustrating the implementation of this method
is given here under:
 1def plan_next_operation(self, fmk_ops, dm, monitor, target, logger, fmk_feedback):
 2    op = Operation()
 3
 4    if fmk_feedback.is_flag_set(FmkFeedback.NeedChange):
 5       op.set_flag(Operation.Stop)
 6    else:
 7       actions = [('SEPARATOR', UI(determinist=True)), ('tSTRUCT', UI(deep=True))]
 8       op.add_instruction(actions)
 9
10    return op
We instruct fuddly to execute a disruptor chain made of the
SEPARATOR generator (transparently created by fuddly from
the eponymous data type in the data model mydf) and the
tSTRUCT disruptor with some parameters (given through
framework.tactics_helpers.UI). And we handle the case when the
chain has been drained. More precisely, we decide to give up when
fuddly inform us that the stateful disruptor tSTRUCT has fully
consumed its input, and cannot provide more outputs without
re-enabling a previous stateful disruptor or in our case the
generator from the chain.
See also
refer to How to Perform Automatic Modification on Data for information about disruptor chains. And refer to Defining Specific Disruptors for insight into disruptors.
Finally, the method
framework.operator_helpers.Operator.do_after_all() is executed
by fuddly after the planned operation has been handled, in order
for the operator to provide some last-minute instructions related to
the previous operation. Typically, it is the moment where the operator
can investigate on the impact of its last operation, before going on
with the next one. An example leveraging this method is discussed in
the following section Defining Probes.
Note
The methods described in this section come with some useful
parameters provided by fuddly when it calls them:
fmk_ops: an object that exportsfuddly’s specific methods to the operator, more precisely it is a reference toframework.plumbing.ExportableFMKOps.dm: a reference to the currentframework.data_model.DataModel.monitor: a reference to the monitor subsystem, in order to start/stop probes and get status from them.target: a reference to the current target.logger: a reference to the logger.fmk_feedback: an object that provides feedback fromfuddlyto the operator about the last operation it performed. The class of this object isframework.plumbing.FmkFeedback.
2.3.6.4. Defining Probes
Probes are special objects that have to implement the method
framework.monitor.Probe.main() which is called either continuously
(the basic probe) or after a specific event in the sending process (the blocking
probes). In order to be started, they have to be first associated to one or more
framework.target_helpers.Target of the project. Then, when such a target is started,
fuddly take care of running the probes.
Probes are executed independently from each other (they run within their own thread). They can interact with the target, and also use the logger. Any usage matching your expectation should be fine. Their purpose is to help you getting feedback from the target you interact with, but they can also be part of the interaction if that seems useful in your setup.
Depending on the kind of probes you want, you will have to choose between two decorators:
@probefor basic probes which run continuously once started. Note there is a delay between each call toframework.monitor.Probe.main()which is configurable.@blocking_probefor probe which will be run just once after each data emission (default) or after each target feedback retrieval. The default behaviour can be changed by giving aafter_target_feedback_retrievalparameter set toTrue.
These decorators have to take the reference of the project as parameter, in order to register them within. A really basic example (not really useful ;) of a basic probe is presented below:
1@probe(project)
2class my_first_probe(Probe):
3
4    def start(self, dm, target, logger):
5        self.cpt = 10
6
7    def main(self, dm, target, logger):
8        self.cpt -= 1
9        return ProbeStatus(self.cpt)
A more useful one (a blocking probe in this case) that tries to get information from the target is given here under:
 1@blocking_probe(project, after_target_feedback_retrieval=False)
 2class health_check(Probe):
 3
 4    def start(self, dm, target, logger):
 5        self.pstatus = ProbeStatus(0)
 6
 7    def stop(self, target, logger):
 8        pass
 9
10    def main(self, dm, target, logger):
11
12        def check(target):
13            status = 0
14            # Do some monitoring of the target
15            return status
16
17        status_code = check(target)
18
19        self.pstatus.value = status_code
20
21        if status_code < 0:
22            self.status.set_private_info("Something is wrong with the target!")
23
24        return self.pstatus
Note
You can implement framework.monitor.Probe.start() and/or
framework.monitor.Probe.stop() methods if
you need to do some stuff during their initialization and termination.
The return status of a probe has to comply with some rules in order to get fuddly
handle status as expected. Status rules are described below:
If the status is positive or null,
fuddlywill consider that the target is OK.If the status is negative,
fuddlywill consider that something happen to the target and will act accordingly by:logging feedback from the probes as well as the status they return to facilitate further investigation;
trying to recover the target, by calling
framework.target_helpers.Target.recover_target().
To quickly retrieve the data that negatively impacted a target and which
have been recorded within the FmkDB (refer to Defining the Logger) you can
run tools/fmkdb.py --data-with-impact -v.
It will display for each target the data you sent for which a negative
status has been recorded, coming either from:
a probe;
an operator (more about that in what follows);
or the
framework.target_helpers.Targetitself (refer to the error status that are transmitted by the generic targets—Generic Targets).
See also
Refer to Generic Probes and Backend for details on the available generic probes that you can use within your project.
In order to associate one or more probe to a target, you have to add them within the targets
global variable of the related project file (refer to Defining a Project Environment). More precisely, for a target A,
instead of putting it directly within the targets list, you have to put a tuple containing first the target itself,
then all the needed probes. Here under an example with the target A associated to the probe health_check, and
the target B with no probe:
1targets = [(A, health_check), B]
You can use any number of probes with any target, and use the same probes for several targets. Moreover, if you want
to specify a specific delay for a basic probe, you can do it by replacing the probe within targets with a tuple
containing the probe itself and the delay expressed in seconds. Here under an example:
1targets = [ (A, health_check, (my_first_probe, 1.4)),
2            (B, (my_first_probe, 0.6)) ]
Finally, you can also leverage probes from within an Operator. If you want to get a status
from probes each time your planned operations have been executed by fuddly, you can do
it within the method framework.operator_helpers.Operator.do_after_all().
Let’s illustrate this with the following example:
 1class MyOperator(Operator):
 2
 3    def start(self, fmk_ops, dm, monitor, target, logger, user_input):
 4        if not monitor.is_probe_launched(health_check):
 5            # This case occurs if the probe is not associated to the target
 6            monitor.start_probe(health_check)
 7
 8    def stop(self, fmk_ops, dm, monitor, target, logger):
 9        monitor.stop_probe(health_check)
10
11    def plan_next_operation(self, fmk_ops, dm, monitor, target, logger, fmk_feedback):
12        self.op = Operation()
13
14        # Let's say the actions to be performed
15        # are guided by a state machine
16        self.op_state = ... # save the current state of the operator
17
18        return self.op
19
20    def do_after_all(self, fmk_ops, dm, monitor, target, logger):
21         linst = LastInstruction()
22
23         health_status = monitor.get_probe_status(health_check)
24
25         if health_status.value < 0 and self.op_state == 'critical':
26             linst.set_instruction(LastInstruction.RecordData)
27             linst.set_operator_feedback('Data sent seems worthwhile!')
28             linst.set_operator_status(-3)
29
30         return linst
In this example, the operator retrieves the status of our
health-check probe and also check what was just performed.
It then correlates both information in order to determine if the test case
is worth to investigate further.
In our example, it occurs when the health check is negative and our operator
state is 'critical'. In such situation, we first order fuddly to
record the data (line 26).
Note
In the case the logger has its parameter
explicit_data_recording set to True (refer to Defining the Logger), you
have to instruct explicitly fuddly to do it if you want to keep
the data, otherwise it will never be logged.
Finally we convey the operator verdict to
fuddly through the framework.operator_helpers.LastInstruction object
it returns, by setting a negative status and some feedback on it.
Note
Setting a negative status through
framework.operator_helpers.LastInstruction will make fuddly act the same
as for a negative status from a probe. In addition, the operator will be shutdown.
2.3.6.5. Defining Tasks
Contrary to probes (Defining Probes), Tasks are not sequenced by the framework, they run asynchronously. They can be periodic or one-shot and their logic need to be defined entirely by the user. They can be started either when a target is launched (see below) or by a step of a scenario (refer to Steps).
To implement the logic of the task, you need to inherit from libs.utils.Task and to
implement the __call__() method. This method is then called either once or with a period that
is specified in the constructor.
When run by the framework this task has some attributes automatically filled that you can leverage
in your logic:
libs.utils.Task.feedback_gate: provide an access to the last 10 seconds of feedback. (framework.database.FeedbackGate)libs.utils.Task.dm: current loaded data model.libs.utils.Task.targets: enabled targets.libs.utils.Task.fmkops: provide access to some framework operations (framework.plumbing.ExportableFMKOps).
Moreover, you could also print some information in another terminal window dedicated to the task.
For such case, you should set the parameter new_window of the libs.utils.Task constructor to
True, then use a specific API composed of libs.utils.Task.print() and libs.utils.Task.print_nl().
Like with probes (Defining Probes), you can associate tasks to targets in order to execute
them when a target is enabled. But they need to be instantiated first (while probes are only referenced
by class name).
Thus, for instance, if you want to run one or more tasks when a target A is enabled by the framework
you have to put in the project targets list, a tuple containing first the target itself, then
all the needed instantiated tasks.
Here under an example with the target A associated to a task of class name myTask, and
the target B without tasks:
1targets = [(A, myTask()), B]
Note
You can mix probes and tasks